Password managers are very useful for anyone having more than one set of credentials, and most of us do.
They reduce the chance of credential leakage to unauthorized people and are vastly superior both post-it papers and notepad files.
However, I found myself using the graphical user interface (GUI) of my password manager daily to simply search copy and paste secret. The problem with navigating a GUI every day is that it’s time consuming, and there’s room for improvement, especially if you enjoy delving into some PowerShell and/or always have a terminal open.
Summary: Password managers GUIs are slow and tedious to work with. Let’s explore an alternative that is much faster!
The solution to this problem that I went with was to create a custom script, which will install and configure my PowerShell session to easily access my password manager after typing in its master password. Together with a couple of functions to easily retrieve and copy-paste my password to the clipboard.
Setting something to your clipboard, especially a password, is a risk since other applications also can access the clipboard, thus the clipboard needs to be cleared by setting a sleep timer and overwriting the secret.
As a start, I will need to create a couple of parameters so the input becomes dynamic, so that I can use the script regardless of what filepath or database name I have on the computer.
It’s an awesome module that I highly recommend for any KeePass & PowerShell user.
I will use SecretManagement to enable the KeePass module and use it’s vault capabilities.
This will save me tons of time and I trust the sources that the modules originate from, to deliver secure and tested code. Much more then I trust myself to think of all security aspects of a something that would replace the modules already offered. Another great benefit of having PowerShell as a gateway to your password manager is that you don’t need to install the vendors application at all, this is a big plus if you’re (like I am) a fan of minimalism.
Next part of the code would be to install the modules:
I set a condition to check if both modules are already present. If not, I try to install them.
Since the Install-Module cmdlets Name parameter accepts a string array (look for String [] in the help files), I wont have to foreach loop through the modules.
To speed things up even further, we want to create some smaller functions to wrap all the long cmdlets that we’d otherwise have to write, to get our secrets to the clipboard.
I say functions, because here’s where you can enable the work we’ve done even further, to work with PSCredentialObjects or start a process, wait, and send the password directly too it, thus generating a sort of custom single sign-on solution. However, sticking to the subject, my function will:
Have a parameter that will be the secret that we’re looking for in our password manager
Look for the secret, use Get-SecretInfo if the name is unknown
Call the GetNetworkCredential method, and accessing the ‘Password’ property of the NetworkCredential object, essentially converting the SecureString to a String, and setting the value to clipboard
Start a job with a ScriptBlock, which will replace the secret with a ‘Cleared!’ string.
functionFind-FSecret{param([parameter(mandatory)][string]$Secret)$SecretLookup=Get-Secret-Name$Secretif($SecretLookup){Set-Clipboard-Value$SecretLookup.GetNetworkCredential().PasswordWrite-Verbose"Secret found and set to clipboard. Will auto clear in 20 seconds."-Verbose$null=Start-Job-ScriptBlock{Start-Sleep-Seconds20Set-Clipboard-Value'Cleared!'-Verbose}}}
I then add this function to my profile, which will load it on my users sessions, together with an alias declaration:
In my example, I’m using KeePass, however this is very applicable to other password managers, in fact the PowerShell Gallery has tons of SecretManagement modules can be just as simple to use as in my examples.
Some examples:
BitWarden
LastPass
Keeper
CyberArk
Devolutions
Look yourself:
Find-Module*SecretManagement*
Another mention is, you want to make sure you’re not leaking your clipboard history. There’s 3rd party applications & settings built into Windows that might do so.
There’s also the possibility for a PowerShell Transcript to catch the output of your console, so make sure you never actually paste the credentials outside of the actual logon screen. You wouldn’t want to screen-share, or share a server with someone who could look into your command-line history and find a password in clear text.
Speaking of which, you can regularly look for passwords in clear text super easily using PSSecretScanner. I would recommend to look into it after completing a project like this.
I am pleased to share that I have been working on a fun hobby project! A PowerShell module designed to facilitate Linux system analysis for PowerShell users. With its standardized noun-verb commands and object-based output, this module leverages the benefits of PowerShell to streamline analysis and information gathering on a Linux system.
Install it from the PowerShellGallery:
Install-Modulelinuxinfo-Verbose
View it’s functions:
Get-Command-Modulelinuxinfo
CommandType     Name                                               Version    Source
-----------     ----                                               -------    ------
Function        Get-BatteryInfo                                    0.0.1      linuxinfo
Function        Get-ComputerInfo                                   0.0.1      linuxinfo
Function        Get-DisplayInfo                                    0.0.1      linuxinfo
Function        Get-FileSystemHelp                                 0.0.1      linuxinfo
Function        Get-NetworkInfo                                    0.0.1      linuxinfo
Function        Get-OSInfo                                         0.0.1      linuxinfo
Function        Get-SystemUptime                                   0.0.1      linuxinfo
Function        Get-USBInfo                                        0.0.1      linuxinfo
There’s more functions similar to the ones described above, where linuxinfo is parsing useful system information and displaying the output as a PSCustomObject. However, taking a look at a different kind of info:
Get-FileSystemHelp-All
Name                           Value
----                           -----
root                           root users home directory
etc                            system-global configuration files
mnt                            temporary mount points
dev                            device files for hardware access
bin                            essential user binaries
run                            stores runtime information
opt                            optional application software packages
media                          mount point for external / removable devices
lost+found                     stores corrupted filesystem files
usr                            user utilities and applications
tmp                            temporary files
var                            variable files
lib                            system libraries and kernel modules
boot                           boot loader files
proc                           procfs - process and kernel information
sys                            sysfs - devices and kernel information
srv                            services data directories
sbin                           essential system binaries
home                           users home directories
Get basic information about the linux filesystem using PowerShell. Can be very handy if you’re coming from a Windows background.
The function supports quick navigation using the -Go parameter, and displaying a richer help message with the -Full parameter.
Currently the module has been tested on Ubuntu and Fedora, so I’m fairly confident that it works good on Debian & RHEL distributions.
However I’ve done no testing on arch linux, therefore I’m not sure how the experience is there. It’s also in an early stage (version 0.0.1), with improvement plans and new functionality. Be sure to hop on the GitHub repo to learn more.
I understand that the use-case for something like linuxinfo is a bit limited since Linux already has great tools for doing similar tasks. However this project is more of a personal journey into learning:
PSCustomObject is a feature in PowerShell that allows you to create structured data in a simple way.
There’s a ton to cover on the topic, but if your unfamiliar with it, first of all it’s probably one of the most important thing to spend time on understanding in PowerShell, secondly the PowerShell docs cover it very well.
In this blog post, I will cover a trick that I frequently use when generating structured data in form of objects that can later be piped to Export-CSV, or even better, Export-Excel
This trick involves when you want to create a boolean (true or false) value in your PSCustomObject variable.
Here’s an example of what I mean:
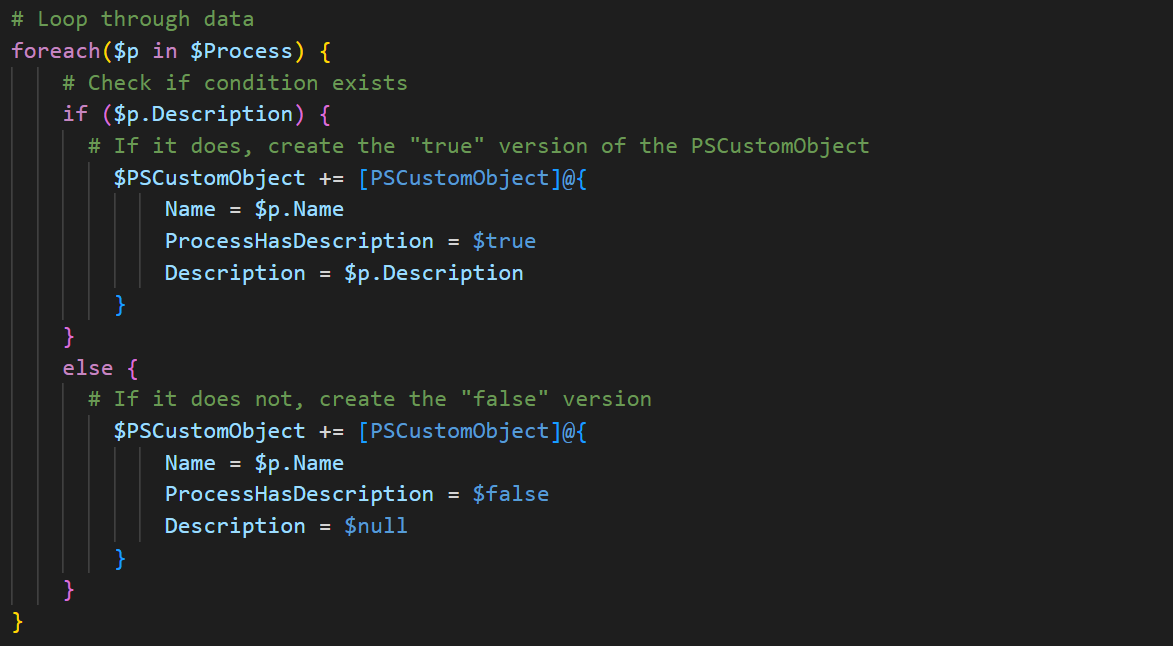
# Create an array object in a variable$PSCustomObject=@()# Get some data$Process=Get-Process|Select-ObjectName,Description-Unique# Loop through dataforeach($pin$Process){# Check if condition existsif($p.Description){# If it does, create the "true" version of the PSCustomObject$PSCustomObject+=[PSCustomObject]@{Name=$p.NameProcessHasDescription=$trueDescription=$p.Description}}else{# If it does not, create the "false" version$PSCustomObject+=[PSCustomObject]@{Name=$p.NameProcessHasDescription=$falseDescription=$null}}}# Show results$PSCustomObject|Select-Object-First10
Output:
Name             ProcessHasDescription Description
----             --------------------- -----------
audiodg                          False
Code                              True Visual Studio Code
CompPkgSrv                        True Component Package Support Server
concentr                          True Citrix Connection Center
conhost                          False
conhost                           True Console Window Host
crashpad_handler                 False
csrss                            False
ctfmon                           False
dllhost                           True COM Surrogate
In this example, the Get-Process command is used to generate a list of system processes. The code then checks if a description is attached to each process. This technique can be applied to generate objects for all kinds of purposes. I’ve found it particularly useful for creating reports on Active Directory, computer hardware, access reports, or any other subject that requires a report with boolean values.
In this post, I aim to keep things short and concise by letting the example do the talking. The code is commented for easy understanding. This technique can be incredibly useful for generating reports or structured data that can inform decision-making in larger processes. I hope you find it helpful and please let me know if you do.
The PowerShell-Docs repository is the home of the official PowerShell documentation. It contains reference and conceptual content for various versions and modules of PowerShell. Contributing to this repository is a great way to learn Git, Markdown and PowerShell, as well as to help improve the quality and accuracy of the documentation.
In this blog post, I will show you how you can contribute to the PowerShell-Docs repository by doing quality contributions, and why it’s beneficial for your learning and development.
Quality contributions are enhancements or fixes that improve the readability, consistency, style or accuracy of the documentation. They can include things like:
Quality contributions are different from content contributions, which involve adding new articles or topics, or making significant changes to existing ones. Content contributions require more discussion and approval from the PowerShell-Docs team before they can be merged.
Before we get into how to make quality contributions, I’d like to shamelessly plug my own module: PowerShell-Docs-CommunityModule
It will help you pick out work that has not been done yet.
Install & try it, using the following code:
Set-Location$env:USERPROFILE# Make sure 'username' reflects your actual github usernamegitclonehttps://github.com/username/PowerShell-DocsInstall-ModulePowerShell-Docs-CommunityModuleFind-MissingAliasNotes-Verbose
To make quality contributions, you need to have a GitHub account and some basic knowledge of Git and Markdown. You also need to install some tools that will help you edit and preview your changes locally. Here are some steps you can follow:
Fork the PowerShell-Docs repository on GitHub.
Clone your forked repository to your local machine using Git.
Install Git, Markdown tools, Docs Authoring Pack (a VS Code extension), and Posh-Git (a PowerShell module).
Check out the PowerShell Docs Quality Contributions project on GitHub. This project tracks all the open issues and PRs related to quality improvements.
Pick an issue that interests you or create a new one if you find something that needs fixing. You can use PowerShell-Docs-CommunityModule to help you here.
Assign yourself to the issue and start working on it locally using VS Code or your preferred editor. Make sure you create a new branch before editing any files. Making a new branch will ensure your edited files is clean in your upcoming Pull-Request.
Preview your changes, make sure you’ve edited the ms.date at the top of the document to todays date (MM/dd/yyy), this way other contributors know when the document has been edited, it’s also required when doing an update, so the owners of the repository will ask you to do this if you miss it.
Commit your changes using Git and push them to your forked repository on GitHub.
Create a pull request (PR) from your forked repository to the original PowerShell-Docs repository on GitHub.
Wait for feedback from reviewers or maintainers of the PowerShell-Docs team.
Address any comments or suggestions they may have until your PR is approved and merged.
You can learn Git, by contributing to a very friendly large code-base project. The owners are more then willing to help you with git related questions. You’ll grow a ton in this area once you start doing some PRs.
You will write/edit files in Markdown (.md), a very popular markup language.
Because you will be proof-reading the markdown documents, you will learn more PowerShell topics straight from the source of the documentation.
You can improve your writing skills by following Microsofts style guides and best practices for technical documentation.
You can get feedback from experts who work on PowerShell, Markdown and Git every day.
You can build your reputation as a contributor by having your name appear in commit history.
In this post, I showed you how you can contribute to the PowerShell-Docs repository by doing quality contributions, and why it’s great for learning Git, Markdown and PowerShell, while at the same time using the PowerShell-Docs-CommunityModule to find out what to do first. We hope this blog post inspires you to join us in making the PowerShell documentation better for everyone.
If you have any questions, comments, or suggestions, please feel free to reach out on a DM either on twitter, email or mastodon!
I hope to see a PR from you, and if you’ve successfully done so because of this post, make sure to notify me about it! 😃
The module “Z” is a handy tool that can save you lots of time when navigating around your terminal. In this blog-post, we’ll cover how to install it to user scope, how to configure it by jumping around the terminal to different places, and how it saves lots of time in the long run.
Once you have Z installed, you can start configuring it by jumping around your terminal to different places. To do this, simply navigate to a directory that you frequently visit and then run z followed by a space and then part of the directory name. For example:
cd C:\Users\MyUser\Documents\Projects\MyProjectcd \zMyProject
This will add C:\Users\MyUser\Documents\Projects\MyProject to Z’s list of directories. The more you use z with different directories, the more accurate it will become at predicting where you want to go.
Once you have Z configured with your frequently visited directories, you can start saving time by using z instead of typing out long paths.
It may not seem that much of a timer-saver at first glance, however the more you get used to using z, instead of cd/tab-completion for navigation, the more time you will save. And I would imagine if you use your terminal daily, the time-savings are huge.
That’s right. The module is actually forked and ported from a bash script, what makes it super useful together with PowerShell is, you guessed it: PSProviders.
Not only can you navigate around your file-system, you can also visit your local reg hive, cert store, and other PSProviders, to save them to your directory history.
cd Cert:\LocalMachine\My\z'Cert:\LocalMachine\My'zC:\zmy
Here, you start out visiting your local certificate store.
You save it to your z directory
You navigate back to C root
And back to your local cert store using only “z my”
This works with lots of different PSProviders, so try it out yourself!
By installing, using and configuring Z, you can save lots of time when navigating around your terminal. By installing it to user scope and configuring it by jumping around your terminal to different places, you’ll be able to quickly navigate to frequently visited directories and other PowerShell provider paths, with just a few keystrokes. Keep in mind that the more you use it, the better it gets, both from a functional standpoint but also the amount of time it saves you (So that you can drink coffee instead 😁 ).
The following module is very important for a Active Directory operations or engineering type person. Most who have tried granting permissions outside of adding users to groups in Active Directory would probably agree that, access delegation can be a daunting task.
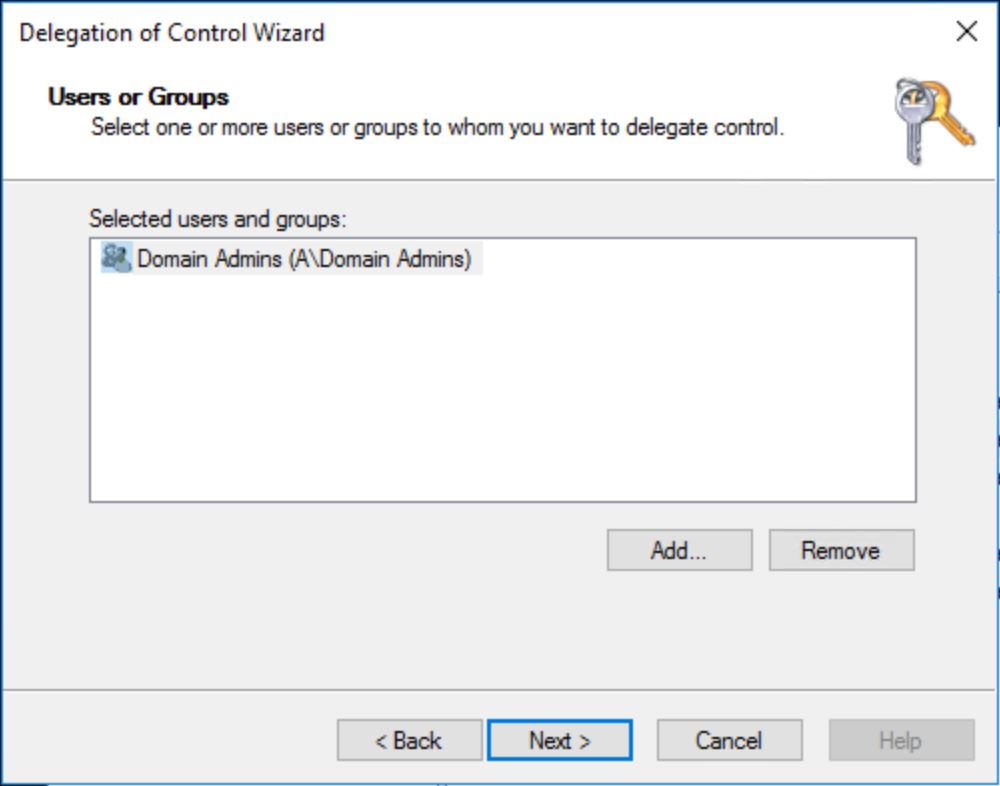
Your best bet is to use the Delegation wizard, but wheres the fun (PowerShell fun..) in that. And how well does it scale? Not very well.
This alternative is probably your best bet outside of the module DSACL. However creating the directory access rules and applying them can be a bit cumbersome.
Both alternatives are fine, but will require you to do some heavy lifting in terms of learning. I will not go into depth into the alternatives here, it’s just a good heads-up that these exists.
If you’ve learnt the basic of using a cmdlet in PowerShell, luckily for you, access delegation is just a module install away.
# Install the DSACL ModuleInstall-Module-NameDSACL-ScopeCurrentUser# Build a splatting table with the desired groups$ParamSplat=@{TargetDN="CN=SalesUsers,DC=Contoso,DC=COM"# DistinguishedName of object to modify ACL on. Usually an OU.DelegateDN="CN=SalesAdmins,OU=Groups,DC=Contoso,DC=COM"# DistinguishedName of group or user to give permissions to.DirectOnGroup=$true}Add-DSACLManageGroupMember@ParamSplat
This example creates a splatting table, and defines the objects to modify ACL (access control list), and user/group to give the permission to.
Gives the SalesAdmins group Full Control over ‘User’ object administrations in the Users OU. Disables Inheritance, making the ACL only apply on the given OU (Users).
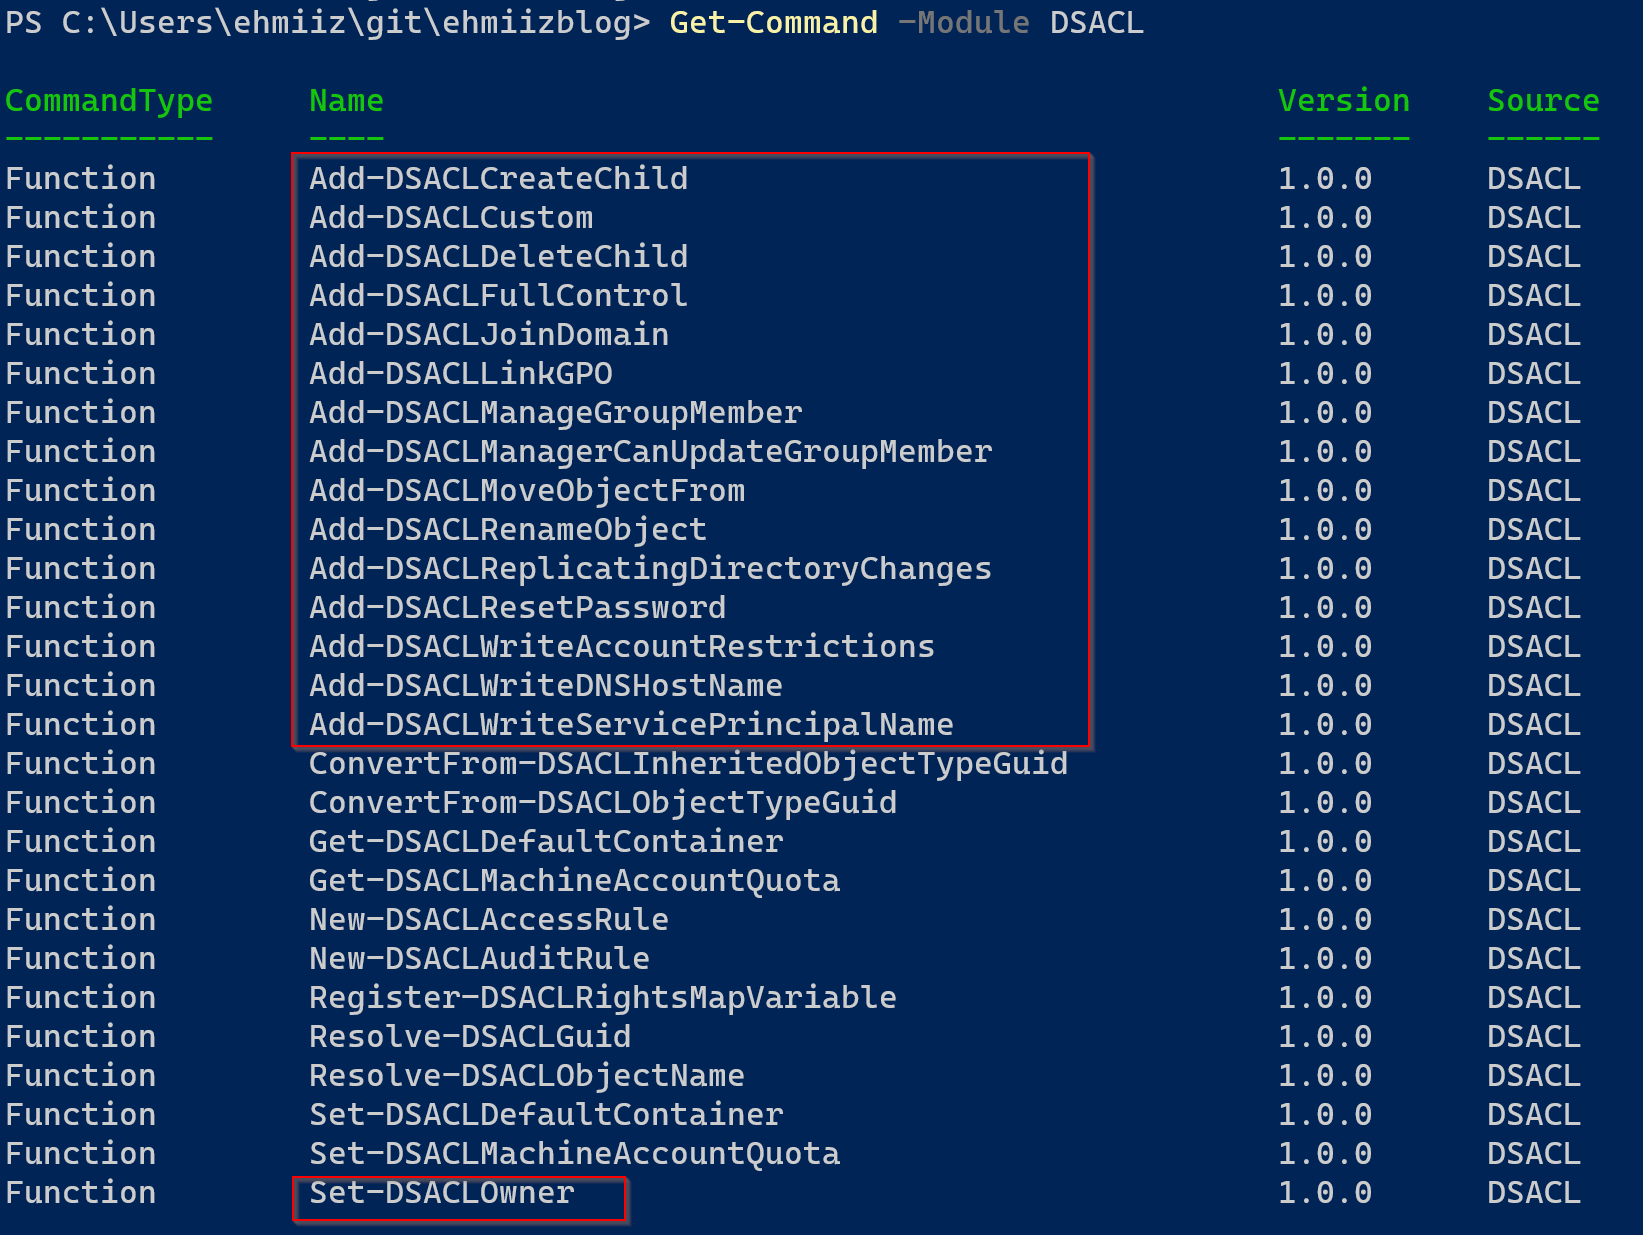
The module contains some really useful cmdlets for managing AD delegation, to name a few:
Set-DSACLOwner
Add-DSACLJoinDomain
Add-DSACLResetPassword
Get-Command-ModuleDSACL
I recommend checking out the online documentation for each cmdlet, as well as running them in lab and verifying the ACL’s once executed.
If your into AD and PowerShell, it’s a fun and very learning experience to fire up some hyper-v VMs using Windows Server Evaluation ISO and a local client with some left-over RAM, and promote some domain controllers to test this module out. An awesome lab module that I recommend for very fast labs, are AutomatedLab. If you want to go a more step-by-step and less abstracted way of setting up a lab, I recommend my own Hyper-V script Labmil.
That’s it. Try it out yourself to discover how easy directory access delegation can be. The amount of AD automation is endless once you get a hang of it, combined with the standard ActiveDirectory module.
As you may have guessed, this post will be about installing certificates using PowerShell.
Every year as someone working with identity topics, I am tasked with renewing certificates across the environment. Many services relies fully on valid certificates in order to function securely.
One critical service in particular that this scenario will cover is: Active Directory Federation Services, ADFS.
In most cases, you will have multiple ADFS servers, meaning, if your not automating already, you will need to install the SSL certificate manually (no fun experience on 10+ servers).
There’s more to say regarding specifically ADFS SSL certificates, that this post will not cover, however an installation will be needed in many of those scenarios as well.
This solution covers how one could do this for ADFS servers, however it carries over to other services that requires a valid certificate as well.
To generate an pfx file out of an external certificate, I recommend using The Digicert Cert Utility to generate the CSR (Certificate Signing Request) on the root server. Then simply import it using the digicert tool, and export the certificate to a .pfx file.
Here’s an example of how to export an already installed certificate as a PFX file:
$PfxPw=(Read-Host-Prompt'Enter a password'-AsSecureString)Get-ChildItem-Pathcert:\localMachine\my\<thumbprint>|Export-PfxCertificate-FilePathC:\Cert\ssl_cert.pfx-Password$PfxPw
It’s important that the certificate gets imported on the server where the CSR was generated, in order to have a valid public/private keypair.
What we need to start out is:
The ADFS Root server with the pfx certificate exported
Access to all ADFS servers
WinRM/PowerShell remoting enabled environment
# Local path to the certificate$PFXPath='C:\Cert\ssl_cert.pfx'# Credential object, we only use the password property$Creds=Get-Credential-UserName'Enter PFX password below'-Message'Enter PFX password below'# Path of the remote server we will copy to$ServerCertPath="C:\Cert\"$InternalServers="SERVER1","SERVER2","SERVER3"foreach($Serverin$InternalServers){# Creates a remote session$Session=New-PSSession-ComputerName$Server# Copies the certificate to the remote sessionCopy-Item-Path$PFXPath-ToSession$Session-Destination$ServerCertPath-Force-Verbose-ErrorActionStop# Imports the pfx certificate using the credentials provided remotelyInvoke-Command-Session$Session-ScriptBlock{Import-PfxCertificate-FilePath$using:ServerCertPath-CertStoreLocationCert:\LocalMachine\My-Password$using:Creds.Password}}
And just like that, you’ve saved truckloads of time every year using PowerShell.
I highly recommend checking out more cmdlets based from the pki and Microsoft.PowerShell.Security module. The script above displays how one can tackle a .pfx certificate, but using Import-Certificate, you could do similar things with .cer files.
Also, one could eliminate the need for generating a password with using something like Microsoft.PowerShell.SecretManagement. This module translates well into a lot of cmdlets in the pki/security module.
If you enjoy the principle of least privileges, version control and doing big infrastructural changes in a safe manner, Advanced Group Policy Management or AGPM, is an amazing tool.
AGPM itself has a few years on its back, and as we sysadmins tend to get easier and easier systems now days, legacy systems can mean complexity.
When combined with new sysadmins that has not been introduced to the concept of AGPM, uncontrolled GPOs might become a problem and the built in error messages are sadly not the greatest.
(GPMC Error) could not take the ownership of the production GPO. Access is denied. (Exceptions from HRESULT : 0x80070005 (E_ACCESSDENIED)).
Access denied is caused by the AGPM service-account not having the permission to take control of the GPO (not having control of a GPO in AGPM really does ruin the point of AGPM). Solving this problem involves giving the service-account the permissions needed, however it’s a bit of a tricky thing to do.
Group Policy Container (GPC), luckily the name is easy to remember because we already understand that AD consists of Organizational Units and… Containers.
The GPC is stored in AD, under “CN=,Policies,CN=System,DC=x,DC=x”. Since it’s an AD object, logically it has attributes describing the object version etc.
Group Policy Template (GPT), is stored in the DC’s system volume (sysvol), under the ‘policies’ subfolder.
The GPT stores the majority of GPO data, it contains a folder structure of files that describes the GPOs functionality, meaning it stores script files, administrative template-based policies and various other security settings.
GPC uses AD replication, and GPT uses DFS-R since its in sysvol. This is important because we will edit the ACLs of both AD and sysvol in order to solve our issue.
Editing its ACL requires generating an ActiveDirectoryRights object with the desired access. This can be done multiple ways, dsacls, using Set-ACL to name a few. In this case I had heard of an amazing module from Simon Wahlin called DSACL, so I can simply do the following:
The ‘TargetDN’ in this case will be the GPCs distinguishedName, and the DelegateDN will be the distinguishedName of our AGPM service-account.
We run the cmdlet twice to mimic the way AGPM edits the ACL in a controlled GPO. AccessSystemSecurity was not needed in the 2nd ACE and therefore I ended up selecting the first 9 (0..8) ADRights.
Since GPT is in sysvol, we now have the task of editing a filesystem ACL. This is different from a directory service ACL. There’s many ways of doing this as well, cacls, and Set-ACL works great. I ended up taking the easy way out and used NTFSSecurity, again another killer PowerShell module with 1,1mil downloads as of writing. And that’s quite understandable considering this is how one can grant full control on a filesystem:
As we have learned, GPC and GPT is a bit different. Sysvol and AD does replicate, but in different ways. Key take-away is that most likely we need to wait for replication in order for the AGPM server to understand that the rights are in fact in place. This took me around 15m, this could have been avoided had I done the changes on the same server.
Using the AGPM module, we’re now ready to take control of the GPO, since we now have the access to do so.
Understanding where a GPO is stored is a nice way of understanding how they work. The reason behind having them stored in separate places most likely goes back to fact that AD is old, and back in the days, size mattered.
Having the GPT files in the AD database (.dit) would simply mean a huge increase in data for AD. Splitting things up and having the DCs taking a bit of storage was probably a good idea back then.
On another note, notice my code in this solution was quite simple. Even thought we did some complex tasks. I was actively not trying to re-invent the wheel, and this is something that gets more important the ‘harder’ the task becomes. Using “blackbox” modules where we only follow the PowerShell standard way of typing out a cmdlet, can be a great way of achieving complex tasks with speed.
It’s also important that when a “blackbox” module solves something for you, go back and try to dig deeper in what it actually did. I find this a good way of learning things in general.
I’ve always been somewhat interested in programming, and PowerShell scripting and module making has put fire to that interest.
The natural next language to learn for me has always been C#, reason being it’s easy to pick up if you already know PowerShell and it enables you to create binary PowerShell modules.
Some content I’ve devoured to increase my C# knowledge are:
C# Fundamentals course on PluralSight by Scott Allen
PowerShell to C# And Back, Book by Deepak Dhami & Prateek Singh
Various YouTube content and talks on building PowerShell Binary Modules using C#:
Building Cross Platform PowerShell Modules by Adam Driscoll
Writing Compiled PowerShell Cmdlets by Thomas Rayner
The above lists are things I’ve went through and I can honestly recommend.
Install a modern version of the dotnet cli together with a dotnet sdk suitable for that version
Init an empty git repo for the new code to live in
Navigate to the folder; dotnet new classlib. This will generate a dotnet class library, once compiled it will generate a DLL file that will be our module
In the csproj file, to make the module compatible with Win PowerShell & PowerShell, we set the TargetFramework to “netstandard2.0”
Remove ImplicitUsings and Nullable Enabled. These are language features we do not need
dotnet add package PowerShell Standard.Library
dotnet add package thenugetpackage
dotnet publish. We have now added the packages needed to start wrapping the nuget package into a PowerShell module
To follow the official PowerShell repos naming standard, all the cmdlets are to be named: VerbNounCommand.cs
The following source code is commented to help one with a PowerShell background to understand it easier:
// Usings, similar to Import-ModuleusingSystem;usingSystem.Management.Automation;usingPasswordGenerator;namespacePasswordGenerator{// VerbsCommon contains a list of approved common verbs, the string Password is the Noun of the cmdlet [Cmdlet(VerbsCommon.New,"Password")]// Cmdletname : PSCmdlet, similar to Function Name {}publicclassGetGeneratedPasswordCommand:PSCmdlet{// [Parameter], default value is 16. If Get > Default, if set > set the value of the paramprivateint_pwLengthDefault=16; [Parameter] [ValidateRange(4,128)]publicInt32Length{get{return_pwLengthDefault;}set{_pwLengthDefault=value;}}privateint_amountDefault=1; [Parameter]publicInt32Amount{get{return_amountDefault;}set{_amountDefault=value;}}// Switch parameters, they turn true if specified [Parameter]publicSwitchParameterIncludeSpecial{get;set;} [Parameter]publicSwitchParameterIncludeNumeric{get;set;} [Parameter]publicSwitchParameterIncludeUppercase{get;set;} [Parameter]publicSwitchParameterIncludeLowercase{get;set;}protectedoverridevoidProcessRecord(){// for loop, same concept as in PowerShellfor(inti=0;i<Amount;i++){if(!IncludeLowercase&!IncludeUppercase&IncludeSpecial&IncludeNumeric){varpwd=newPassword(Length).IncludeSpecial().IncludeNumeric();varpassword=pwd.Next();WriteObject(password);}elseif(IncludeNumeric&!IncludeSpecial&!IncludeUppercase&!IncludeLowercase){varpwd=newPassword(Length).IncludeNumeric();varpassword=pwd.Next();WriteObject(password);}elseif(IncludeSpecial&!IncludeNumeric&!IncludeUppercase&!IncludeLowercase){varpwd=newPassword(Length).IncludeSpecial();varpassword=pwd.Next();WriteObject(password);}elseif(!IncludeNumeric&!IncludeSpecial&IncludeUppercase&IncludeLowercase){varpwd=newPassword(Length).IncludeLowercase().IncludeUppercase();varpassword=pwd.Next();WriteObject(password);}elseif(!IncludeNumeric&!IncludeSpecial&!IncludeLowercase&IncludeUppercase){varpwd=newPassword(Length).IncludeUppercase();varpassword=pwd.Next();WriteObject(password);}elseif(!IncludeNumeric&!IncludeSpecial&!IncludeUppercase&IncludeLowercase){varpwd=newPassword(Length).IncludeLowercase();varpassword=pwd.Next();WriteObject(password);}elseif(!IncludeNumeric&IncludeLowercase&IncludeUppercase&IncludeSpecial){varpwd=newPassword(Length).IncludeLowercase().IncludeUppercase().IncludeSpecial();varpassword=pwd.Next();WriteObject(password);}elseif(!IncludeNumeric&IncludeLowercase&IncludeUppercase&IncludeNumeric){varpwd=newPassword(Length).IncludeLowercase().IncludeUppercase().IncludeNumeric();varpassword=pwd.Next();WriteObject(password);}elseif(!IncludeNumeric&!IncludeUppercase&IncludeSpecial&IncludeLowercase){varpwd=newPassword(Length).IncludeLowercase().IncludeSpecial();varpassword=pwd.Next();WriteObject(password);}elseif(!IncludeSpecial&!IncludeUppercase&IncludeLowercase&IncludeNumeric){varpwd=newPassword(Length).IncludeLowercase().IncludeNumeric();varpassword=pwd.Next();WriteObject(password);}elseif(!IncludeLowercase&!IncludeNumeric&IncludeUppercase&IncludeSpecial){varpwd=newPassword(Length).IncludeUppercase().IncludeSpecial();varpassword=pwd.Next();WriteObject(password);}elseif(!IncludeLowercase&!IncludeSpecial&IncludeUppercase&IncludeNumeric){varpwd=newPassword(Length).IncludeUppercase().IncludeNumeric();varpassword=pwd.Next();WriteObject(password);}elseif(!IncludeUppercase&IncludeLowercase&IncludeNumeric&IncludeSpecial){varpwd=newPassword(Length).IncludeLowercase().IncludeSpecial().IncludeNumeric();varpassword=pwd.Next();WriteObject(password);}elseif(!IncludeLowercase&IncludeUppercase&IncludeNumeric&IncludeSpecial){varpwd=newPassword(Length).IncludeUppercase().IncludeSpecial().IncludeNumeric();varpassword=pwd.Next();WriteObject(password);}else{varpwd=newPassword(Length).IncludeLowercase().IncludeUppercase().IncludeSpecial().IncludeNumeric();varpassword=pwd.Next();WriteObject(password);}}}}}
The rest is a matter of figuring out how the package works, and what it supports.
Make sure to try to get all the functionality of the package out in the PowerShell module. Obviously it might require you to make more cmdlets.
Next blog will be how I published my module to the PowerShell Gallery. Using Git, Github, PSGallery and PlatyPS.
The goal of that pass-gen was to have a script in my $Profile that would simply work on both PowerShell 5.1 & PowerShell 7+. The goal was also to cover AD complexity rules, and it did just that.
This time I’ve taken a whole new bull by the horn. While looking for a nuget package for password generators, out of curiosity on how a .net/C# developer would tackle the challenge that is coding a password generator, I stumbled upon “PasswordGenerator”.
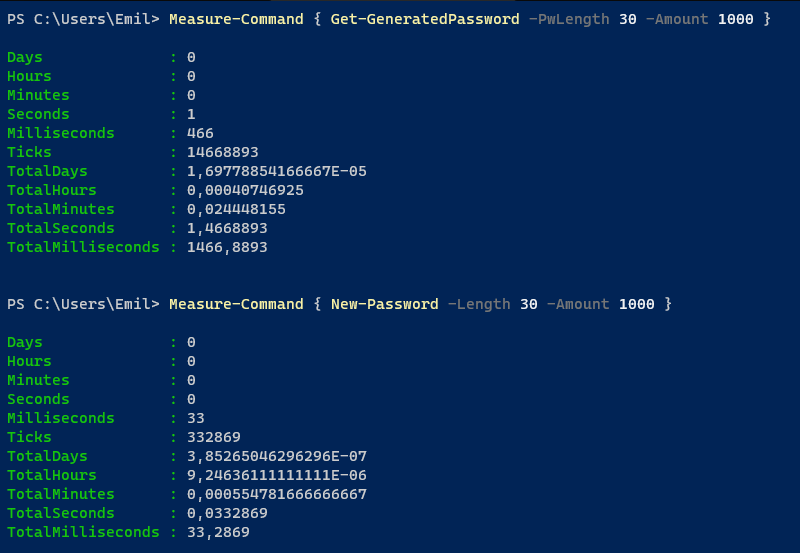
To my surprise, the package has reached 1.6 million(!!!) downloads. I figured this package must be something special, some sort of holy grail of pass gens. And while I’m no C# expert, I’m always up for a challenge!
So I shamefully forked the repository and started working on a binary PowerShell cmdlet that would mimic the nuget package. 7 versions and 29 commits later, “BinaryPasswordGenerator” was born!
# By default, all characters available for use and a length of 16# Will return a random password with the default settingsNew-Password
# Same as above but you can set the length. Must be between 4 and 128# Will return a password which is 32 characters longNew-Password-Length32
# Same as above but you can set the length. Must be between 4 and 128# Will return a password which only contains lowercase and uppercase characters and is 21 characters long.New-Password-IncludeLowercase-IncludeUppercase-Length21
# You can build up your reqirements by adding parameters, like -IncludeNumeric# This will return a password which is just numbers and has a default length of 16New-Password-IncludeNumeric
# As above, here is how to get lower, upper and special characters using this approachNew-Password-IncludeLowercase-IncludeUppercase-IncludeSpecial
# This is the same as the above, but with a length of 128New-Password-IncludeLowercase-IncludeUppercase-IncludeSpecial-Length128
# One Time Passwords# If you want to return a 4 digit number you can use this:New-Password-IncludeNumeric-Length4
# Convert to SecureString$pw=New-Password|ConvertTo-SecureString-AsPlainText-Force# Set a password in your SecretVault using Secret Store/ManagementSet-Secret-Name'User'-Secret(New-Password-Length128)-VaultPSVaultGet-SecretUserSystem.Security.SecureStringGet-SecretUser-AsPlainTextu%4EkQlMpVjPnO5VM5tYcnUE!F!D3wvhB8w595LXqIEAny1XC4OVn4\x!1Q79Nlj!QwK!zBVkFUAHVy44iEIO2icVE0meAz3YEWudP9UdKrjbrp8nJ8DECVll2Uq!kt5